¶ Drivers
In this section you will be able to manage the drivers:
- Create Driver Account;
- Edit;
- Block and Unblock the Driver;
- Configure the terminal (display a QR code and a temporary code to configure the terminal);
- Control the Driver's Interlocks;
- Top up the Driver's Balance;
- Remove the Driver (Put it in Archive);
- Restore the Driver from the Archive.
The driver will not be able to work until he or she is added to the program database. To add a new driver, click on the appropriate button, enter the necessary information and click on the "Save" button.
This section will display all active drivers and basic information about them. The color of the text displaying the balance value shows the relativity of the blocking threshold (red - below the threshold, green above).
Active. If it is checked, the driver will be able to fully work with the system, but if it is not checked (the driver is blocked), for all actions of the driver (request free orders, registration on the parking lot, etc.) the driver will receive a message about blocking.
Blocked. If it is checked, then the driver has been manually blocked. If it is marked with a cross - it can work.
¶ Adding a driver
When adding a driver, you will need to provide the following information:
- Service. This field will be used when reporting on service. Specify which service the driver will engage in. The services are configured in Under "Services";
- Driver Profile This is the field where you find the previously created driver profile, i.e. the services and order queues in which the driver is engaged. The driver profiles are set up in Profiles;
- The Driver's Call Sign. It may consist of numbers or letters. Please note that the driver will be displayed by his call sign in the dispatcher's panel, so we do not recommend using too long call signs for convenience;
- ** Connection Type.** Determines how the driver interacts with the system. If "terminal" is selected: the driver works with the system through the driver's terminal (the program is installed on the smartphone). If "radio" is selected: all actions for the driver are performed by the dispatcher, communicating with the driver is by radio;
- Registration Number. The registration number of the car. You can fill in the letters for accounting purposes, but only the numbers are important for the system (the calling robot will use when automatically reporting the car and the car to the client);
- Colour and Make of Auto. Select the color and brand of the car for automatic calls. Another line with the same name items (color and car brand) exist for display at the dispatcher, in the call application and in SMS. You can edit these items;
- Name;
- Telephone. The driver's cell phone number, which is used to contact the driver if necessary. If it will be necessary to connect the passenger with the driver, this number will be used. You should specify the number in international format (starting with +);
- Priority. Priority can be a negative number. The higher the priority of the driver, the faster he will receive the order. Before generating an order for automatic car search, the system sorts the queue of cars taking into account the position and priority. This option works only if priority accounting is enabled in the settings:
in Delive Admin Panel -> Settings -> Server Settings -> Orders -> Enable sorting by priority; - **If you plan to use the billing system to pay the driver, you must specify which billing group the driver belongs to. The calculation groups will be described below.;
- Note. This note will be seen by the dispatcher when pointing at the driver or in a pop-up message on the order;
- Can accept corporate passengers. It speaks for itself: Driver can or canot fulfill the orders of corporate partners;
- Comment.. This field is visible only in the administrative panel;
- Shift Start and Shift End. If you want to record the driver's hours of operation. At other times the driver will be locked out;
- ** Permit number**. This is where you can enter the driver's permit number for his activity;
- Car class. Here you can specify driver's car class;
- Options. You can specify what options the driver has, so that this driver will participate in the selection of the car, if one of the options was specified when creating the order;
- See Destination Address. Be careful with this one. This is ignoring the destination address hiding setting;
- Login, password. Used to authorize the driver's terminal. Login must be unique;
- Photo. Displayed in the passenger app.
Driver setup video from video presentation:
https://youtu.be/XtHpxIIDrmY?t=319
¶ Menu of Operations with Drivers
The system allows you to perform a number of operations with drivers. You can click on a driver in the list (to perform operations on a specific driver) or click on the "Actions on objects" button in the upper left corner of the table (to perform operations on selected drivers).
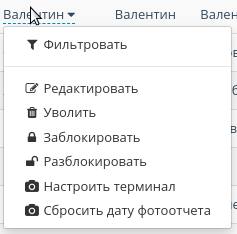
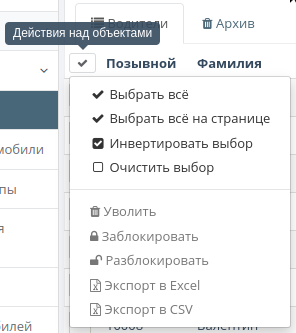
⚠️ Please note! Some operations are available only for a single driver or only for a group of drivers.
¶ Control of the Driver Interlocks
From the operations menu you can lock or unlock the driver.
¶ Locking the Driver
You can lock the driver temporarily or permanently. Depending on your choice, the interface will change accordingly.
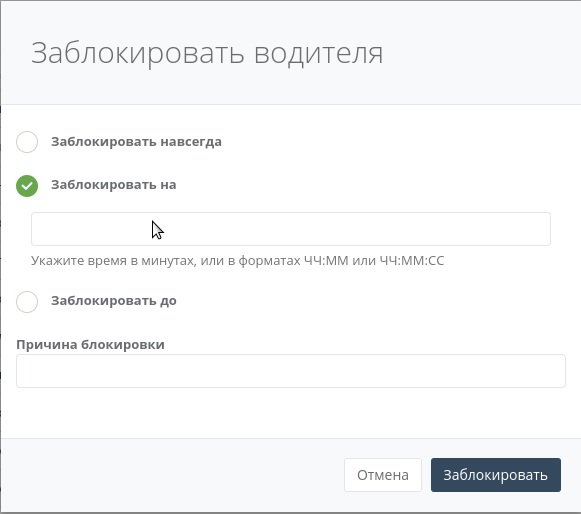

You can also specify an arbitrary reason for the lockout, which will be displayed to the driver in the lockout message.
⚠️ Please note! The blocking time can be increased through this interface, but cannot be decreased. That is you can, without unlocking the driver, lock the driver once again for a longer time, but to reduce the block time you must first unlock the driver.
СКАТ 7.0 You can lock the driver temporarily or permanently.
СКАТ 6.0 и ранее You can only permanently block the driver with the reason.
¶ Unblocking the Driver
You can view the block information of a particular driver by selecting unblock in the operations menu.
In doing so, you can selectively remove the block.
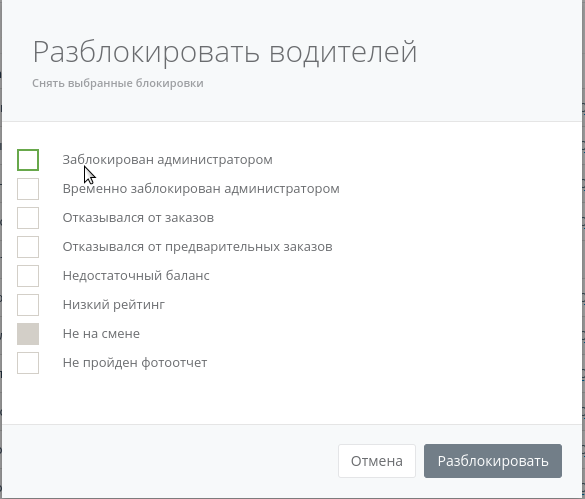
When you select a group of drivers, a list of all existing interlocks in the system will be displayed and you can also selectively remove them.
⚠️ Please note! You cannot unblock the "Driver not on shift" lock via this interface. Use the shift management interface to remove it.
SKAT 6.0 and earlier In these versions of the software, you cannot view the list of block items, and the blocking of the balance, and blocking of the administrator will always be removed.
¶ Driver Balance
If you click on the balance, a list with operations on the balance will drop out (here you can change the balance of the driver).

To change the balance, you must enter the value by which you want to change the balance, i.e. if the driver's balance needs to be reduced, a negative number must be entered. If you need to collect statistics on driver payments in the office, it is better to refer to the section in
SCAT admin panel -> Payments -> Payments to driver accounts
¶ Drivers Archive
This section displays archived drivers. All drivers remain in the database upon removal, the date and reason for removal are entered in the note. If you wish, you can restore the driver, but after that it is necessary to assign a new login and password
¶ Payment Calculation Groups
In this section, you can define one or more calculation groups. These groups are assigned to the driver (when adding or editing). Only one calculation group can be assigned to each driver.

You can watch our video presentation on YouTube:
https://youtu.be/XtHpxIIDrmY?t=746
¶ Company's Vehicles
In this section, you manage the cars that belong to your taxi fleet. They are assigned by the dispatcher to a specific driver. Tasks associated with company's vehicle is carried out similarly to drivers.
¶ Announcements for Drivers
There is an announcement section in the driver's terminal. In this section, you can manage announcement that are displayed to drivers in the program. To add an announcement, click the "add" button and fill in the fields as you need. You can also edit existing announcements or delete them. When adding and editing, there is an announcement priority field - the higher the priority, the higher the announcement in the driver's list. When adding an announcement, a push message will be sent to all drivers (Delive 4.0 and higher)
¶ Photo Report (Photo Inspection)
In this section, the administrator can:
- View photo report of the drivers;
- Accept or reject photo reports;
- View photo archives.
¶ How to Set Up Photo Inspection
Information is in our documentation page.
¶ Vehicle Class
¶ Description
Vehicle class is the type of transport indicated in the driver's profile. The dispatcher can select the required class when creating an order.
¶ What is the Difference between "Class of Vehicle" and "Service"?
-
The main difference is the order queue, which is specified in the service. Within the queue, a search will take place, however, if vehicle class is also selected, then the software will search inside the order queue, service that the client has selected and the desired vehicle class. Roughly speaking - a double filter for drivers.
-
Vehicle Classes is a predefined directory that is synchronized with the exchange service for a conflict-free exchange of orders between different taxi companies. That is, you cannot rename or add new classes in the administration panel.
-
The order queue in the service has rules for transferring orders to other queues, but Auto Classes do not.
If in "Queue 1" + "Comfort" orders are transferred to "Queue 2", + "Comfort" drivers in "Queue 2" will receive the order as well.
- "Classes of vehicles" does not have the ability to set up a dedicated number for incoming calls.
¶ How to set up a vehicle class?
In the Delive admin panel > Drivers > Drivers > edit the driver and select the class.

If you need to combine classes, then you can do it:
In the admin panel > Drivers > Car classes > edit.
For example, Comfort+ will also include Comfort drivers.

¶ Promised Payments
You can include promised payments in
Delive Admin Panel -> Settings -> Server Settings -> Promised Payments.
This section displays the history of promised payments from drivers. You can also independently issue the promised payment to the right driver using the “Add promised payment” button
¶ Drivers Bonus Accounts
This section displays the bonus balances of drivers.
¶ Bonus Rewards
In this section, you can specify the goods (rewards) that the driver can use (buy for bonuses) in the personal account, in the driver's terminal.
To start using bonus rewards you need to include in
Delive admin panel -> Settings -> Server settings -> Driver bonuses -> Allow to buy goods
There are 2 types of rewards:
- priority;
- Payment Groups.
⚠️ Note!
Time-based payment groups.
If the bonus payment group has a calculated value, then after the driver spends the bonuses to purchase the payment group, he still needs to activate it for the money on the balance.
¶ Driver Reviews
This section displays a list of passenger testimonials using the passenger application.
To enable reviews, you must
Admin Panels -> Settings -> Server Settings -> Driver Ratings -> Enable Driver Ratings
You can also fine-tune Templates of reviews in the application control panel.
